

Home server made easy. A Raspberry Pi is now too mainstream, too expensive, too underpowered, too complicated, too bare without a heatsink and case? Raise the curtain on the Zimaboard, an all-in-one alternative with two LAN and SATA ports and even a PCIe slot, fully configurable, with a stronger X86 instead of an ARM processor and almost unlimited expandability. With this, it wants to conquer the maker, DIY and consumer hearts.
Christian Hintze, 👁 Enrico Frahn, ✓ Brian Burriston (translated by DeepL / Ninh Duy), Published 06/25/2023 🇩🇪


“The Zimaboard is a low-cost single board server for makers and geeks” states the manufacturer’s website. “Worlds First Hackable Single Board Server” is written on the packaging. The term “inexpensive” may be debatable (3 models, 120 to 200 US dollars).
The Zimaboard wants to be an X86 alternative to the Raspberry Pi and invite users to experiment. For this, the manufacturers rely on an uncomplicated all-in-one package on the one hand, which provides a single board computer (SBC) with a heat sink, case and various practical connections on the other. And not to forget: This is not an ARM SBC, but an Intel X86 system, so you have much more software compatibility. Even if the CPU already has a few years under its belt, Windows runs on the small board thanks to the quad-core CPU.
On the other hand, the open approach for maker and consumer is kept, which is why the Zimaboard fully relies on open source and extensions.
This combination allows the SBC with Intel Celeron Apollo Lake to be configured as a home server, media server, router or all sorts of other projects, depending on the user’s wishes. Important in this regard is certainly also the consumption, which is supposed to be only 6 W. Similar to the Raspberry Pi, there are only a few limits to your own ideas.
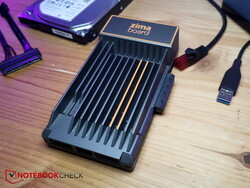
We would describe the design of the Zimaboard as quite interesting. If you didn’t know what the Zimaboard was about, you would be puzzled at first. Because of the PCIe slot on the side, you could easily mistake it for a stylish expansion card at first glance.
The board measures about 13.8 cm in length, it is about 7.4 cm wide (~5.4 x 2.9 inches) in most places, and the PCIe slot protrudes another 0.65 cm (~0.3 in) on the side.
The upper side consists almost entirely of metal cooling fins, so that purely passive cooling can be used here, and most of the ports can be protected at the front at the same time. The gray design with orange accents makes the large cooling fins look quite stylish. In the front, where the metal covers the ports, the “Zimaboard” lettering is also in orange.
At the bottom, we have partially transparent plastic or black tinted Plexiglas. The underside is almost completely flat, only 4 small black Phillips screws break through the smooth base plate, which also makes the board easy to open. Here we also find the product name in orange as well as three white stripes that run parallel along the length of the case. The Zimaboard is not a bare board like the Raspberry Pi.
The Zimaboard is well built. The upper and lower sides as well as the circuit board are tightly assembled, there are no gaps. Especially the metal upper side seems very stable and protects against damages. However, you shouldn’t put too much pressure on the board, the plastic underside quickly emits threatening cracking noises, but everything remains stable on the top.
There is an opening to the right of the PCIe slot, where dirt could get inside. However, the opening is intentional, since there are contacts here that can be soldered to further connections, for example power, switches, LEDs and the like.
The manufacturer IceWhale Tech offers three variants of the Zimaboard, whose designations are based on the memory equipment and are thus easy to remember. Thus, the smallest Zimaboard 216 only offers 2 GB of RAM and 16 GB of eMMC storage. The Zimaboard 432 already has 4 GB RAM and 32 GB eMMC and the largest Zimaboard 832 has 8 GB RAM and also 32 GB eMMC. The connectivity is the same, but the CPU and memory configuration differ. The manufacturer sent us the top model.
Each Zimaboard is equipped with an X86 Celeron CPU, the smallest model Zimaboard 216 with the dual-core N3350 CPU, the other two with the Quad Core N3450. All three have integrated Intel HD Graphics 500, which is clocked 50 MHz lower in the low spec model.
Equipment/ModelZimaboard 216Zimaboard 432Zimaboard 832ProcessorIntel Celeron N3350, Dual CoreIntel Celeron N3450, Quad CoreIntel Celeron N3450, Quad CoreGraphicsIntel HD Graphics 500, 200 MHz base, 650 MHz burstIntel HD Graphics 500, 200 MHz base, 700 MHz burstIntel HD Graphics 500, 200 MHz base, 700 MHz burstRAM2 GB4 GB8 GBOnboard MMC memory16 GB32 GB32 GBTDP/Power consumption6 WConnections2x SATA 6.0 Gb/s, 2x GbE LAN (Realtek 8111H), 2x USB 3.0, 1x PCle 2.0 x4, 1x Mini-DisplayPort 1.2 ([email protected]), Power DC 12V 5.5 x 2.5mm
FeaturesPassive cooling; Virtualization: Intel VT-d, VT-x; Security: AES-NI; Transcoding: Support for 1080P videos, Decoding: H.264 (AVC), H.265 (HEVC), MPEG-2, VC-1
Size & Weight138.7 x 81.4 x 34.9 mm; 278 g
However, the SBC only becomes truly versatile with its connections: Two GbE LAN ports via a Realtek 8111H provide server potential, two SATA 6.0 Gb/s ports let the Zimaboard become cloud storage via connected SATA storage. In addition, there are two USB-A ports 3.0 and a mini DisplayPort 1.2 with [email protected] However, the most interesting feature is probably the PCle 2.0 x4 slot. Almost any number of expansion cards can be connected via this, of which the manufacturer itself offers some on its homepage. For example, cards with additional LAN ports or cards with M.2 ports and so on.
The software is one of the highlights on the Zimaboard, even though you can of course replace it with your own OS ideas, just like on the Raspberry Pi. The pre-installed CasaOS with Debian as the base is graphical and web-based, so it can be controlled comfortably from the browser and can be used quite easily and intuitively even by beginners. For example, the dashboard provides a good overview of CPU and memory utilization, mass memory usage, all installed apps, etc.
The highlight of the software developed by Zimaboard manufacturer IceWhale is that it manages all other apps in Docker containers. Via the “App Store”, a large number of apps can be installed in containers pre-configured at the push of a button, including well-known software such as Jellyfin, Proxmox, NexCloud, pfsense, OpenNAS and many many more.
Docker management also makes it easy for multiple apps on the Zimaboard to run simultaneously, each in their own compartmentalized environments, without affecting each other, if that is desired.
The first setup is super simple: You connect the Zimaboard to the power supply and the router via LAN cable, and you can connect to the board via browser and CasaOS. The first software can then be installed via the App Store.
Alternatively, you can connect a monitor and keyboard/mouse and use the board as a PC. However, we prefer to use it as a versatile server. Windows runs, but the performance is not really designed for that.
The biggest difficulty: deciding at the beginning which project you actually want to implement – a media server to play your own videos, your own cloud storage, a web server, a firewall, a router, a gaming server…. Ahh, so many possibilities!
If in doubt, simply implement several projects at once, using virtual machines with Proxmox, for example. The app is not available in the store, but can also be installed via USB stick. For this, you have to connect a monitor and keyboard and enter the BIOS (yes, an Intel PC) to change the boot order (boot from the USB stick). But you also need an external storage, the internal eMMC is not enough for Proxmox.
And so you start to think bigger step by step, but the first projects are also quite simple with what the Zimaboard brings from itself.
For example, setting up a local media server, over which you can watch your own movies and videos. For example, you can install Jellyfin from the App Store in CasaOS with just two clicks. Then you start the app, set up access data, upload a few videos to the Zimaboard, specify the folder in Jellyfin, and you’re done. And you can watch the videos from any PC in your network. The same applies if you want to share files easily between several devices in the network. If you have a domain or get one, you can also access it on the go.
Most of it worked and was wonderfully straightforward. We stumbled across a few minor errors. First, there was the update button. The update did not work via the button in the settings. A few terminal commands from the vendor (“curl -fsSL get.casaos.io/update | sudo bash”) revealed that some names in the git repository had changed and the update button could not link to the correct versions. But a simple “sudo apt update” could solve everything manually.
The installation of PCIe cards is not entirely unproblematic. Since they are usually designed for desktop PCs, they usually come with a slot bracket, which can make installation difficult. Depending on the model, the slot bracket sits exactly on the Zimaboard case, so that the card can’t be inserted easily. If you get a card where the slot bracket doesn’t touch directly, it at least covers the MiniDP port. In case of doubt, you either have to remove the slot bracket or bend it to the side.
The Zimaboard does not need an active fan, it is passively cooled, thus noiseless. The large, metal cooling fins are responsible for dissipating waste heat, which also give the board its unmistakable design. Since the entire upper side is covered by the cooling fins, the surface temperatures in the Zimaboard are very limited. During idle periods we measured a temperature of about 32 °C (89.6 °F) on the upper side.
Under more demanding tasks, such as transcoding videos (Intel Quicksync support) or other loads, the board naturally warms up more. After about 5 minutes of video transcoding in Jellyfin, we measured up to 43 °C (109.4 °F) on the upper side, while the underside remained slightly cooler at 38 °C (100.4 °F) .
The dashboard shows a CPU load of 2% when idle without an active app or other load. The system consumes just under 2 W.
When playing an MKV video including transcoding, a CPU load of 55% is displayed. The consumption increases to around 8 W.
Generally, the consumption does not exceed 10 W even under higher load. This also corresponds to what IceWhale states for the Zimaboard.
Pros
+ practical all-in-one design
+ many connections
+ passively cooled
+ low consumption
+ clear CasaOS with Docker
+ also invites beginners to experiment
Cons
– few apps in the store
– PCIe slot does not fit optimally for many cards
– Hardware transcoding only up to 1080p

Experimenters and even beginners will enjoy the Zimaboard. It offers an incredible number of possibilities that invite you to play around and try things out, because projects can be implemented comparatively quickly and easily. With minimal barriers you can also learn a lot with the Zimaboard, just trying things out, the entry barrier is low. In this way, almost anyone with a little research can implement a media server, cloud server, gaming server or various other projects with the Zimaboard.
The Zimaboard is silent, stylish, flexible, easy to use and invites experimentation. With the simple CasaOS you can quickly implement your own server projects.
Of course, the processor is no longer up to date, even if the performance is much better than on the Raspberry Pi. But the CPU is still from 2016, IceWhale could update their board, maybe there will be a new generation of Zimaboards soon (according to IceWhale probably at the end of the year). And the PCIe slot is not optimally aligned, so that the slot bracket interferes with various expansion cards and has to be removed, also in order not to cover the MiniDP port.
The Zimaboard is available in three variants at Zimaboard.com. The weakest one starts at around 120 US dollars, the medium version costs around 160 US dollars and our test model with the best features costs around 200 US dollars.

Transparency

The present review sample was made available to the author as a loan by the manufacturer or a shop for the purposes of review. The lender had no influence on this review, nor did the manufacturer receive a copy of this review before publication. There was no obligation to publish this review.


A C64 marked my entry into the world of PCs. I spent my student internship in the repair department of a computer shop and at the end of the day I was allowed to assemble my own 486 PC from “workshop remnants”. As a result of this, I later studied computer science at the Humboldt University in Berlin, with psychology also being added to my studies. After my first job as a research assistant at the university, I went to London for a year and worked for Sega in computer game translation quality assurance. This included working on games such as Sonic & All-Stars Racing Transformed and Company of Heroes. I have been writing for Notebookcheck since 2017.

Translator: Ninh Ngoc Duy – Editorial Assistant – 313711 articles published on Notebookcheck since 2008
My main responsibility as an editorial assistant is maintaining the Library section, which aggregates reviews from other publications and channels. In addition, my daily breakfast is Notebookcheck’s long list of new content, which I comb through to select the most interesting topics for translation from English to French, Italian, Spanish, Portuguese, and Dutch.”
Christian Hintze, 2023-06-25 (Update: 2023-06-25)
>>> Read full article>>>
Copyright for syndicated content belongs to the linked Source : NotebookCheck – https://www.notebookcheck.net/Raspberry-Pi-alternative-Zimaboard-in-hands-on-Versatile-X86-single-board-all-rounder-invites-you-to-try-and-learn.728040.0.html